리니어 레이아웃 자체는 gravity, 그 안의 컴포넌트는 layout_gravity를 사용한다
gravity 속성은 android : gravity = "right|bottom" 으로 두개를 조합하는 것도 가능하다
background는 그냥 background를 사용한다
radio그룹내의 라디어 버튼은 중복 선택 x
버튼같은 위젯은 backgroundTint 넣자..
책내용
android:rotation="45" <- 45도 회전
string myStr = myEdit.getText().toString(); <- 에디트텍스트에서 문자열 가져오기
수업때 다룬 코드
키보드 숨기기
final InputMethodManager imm=
                (InputMethodManager)getSystemService(
                        Context.INPUT_METHOD_SERVICE);
imm.hideSoftInputFromWindow(
      getCurrentFocus().getWindowToken(),0);
계산기
<?xml version="1.0" encoding="utf-8"?>
<LinearLayout xmlns:android="http://schemas.android.com/apk/res/android"
    xmlns:app="http://schemas.android.com/apk/res-auto"
    xmlns:tools="http://schemas.android.com/tools"
    android:layout_width="match_parent"
    android:layout_height="match_parent"
    android:orientation="vertical"
    android:paddingLeft="20dp"
    android:paddingRight="20dp"
    tools:context=".MainActivity">
    <EditText
        android:id="@+id/edit1"
        android:hint="su1>>"
        android:textSize="25dp"
        android:layout_width="200dp"
        android:layout_height="wrap_content"/>
    <EditText
        android:id="@+id/edit2"
        android:hint="su2>>"
        android:textSize="25dp"
        android:layout_width="200dp"
        android:layout_height="wrap_content"/>
    <Button
        android:id="@+id/btnAdd"
        android:text="+"
        android:textSize="30dp"
        android:layout_width="match_parent"
        android:layout_height="wrap_content"/>
    <Button
        android:id="@+id/btnSub"
        android:text="-"
        android:textSize="30dp"
        android:layout_width="match_parent"
        android:layout_height="wrap_content"/>
    <Button
        android:id="@+id/btnmul"
        android:text="*"
        android:textSize="30dp"
        android:layout_width="match_parent"
        android:layout_height="wrap_content"/>
    <Button
        android:id="@+id/btndiv"
        android:text="/"
        android:textSize="30dp"
        android:layout_width="match_parent"
        android:layout_height="wrap_content"/>
     <TextView
         android:id="@+id/result"
         android:textSize="30dp"
         android:background="#EF9E85"
         android:textColor="#00f"
         android:layout_width="match_parent"
         android:layout_height="match_parent"/>

</LinearLayout>


--------------------------------------------------------------
package com.example.compute2;//각자작성한 프로젝트명으로 반드시 변경해야 함

import androidx.appcompat.app.AppCompatActivity;

import android.content.Context;
import android.os.Bundle;
import android.view.View;
import android.view.inputmethod.InputMethodManager;
import android.widget.Button;
import android.widget.EditText;
import android.widget.TextView;

public class MainActivity extends AppCompatActivity {
//멤버변수
 EditText edit1, edit2;
Button btnAdd, btnSub, btnMul, btnDiv;
TextView result;
Integer res, su22,su11;
String su1, su2;
//멤버메소드
 @Override
 protected void onCreate(Bundle savedInstanceState) {
super.onCreate(savedInstanceState);
setContentView(R.layout.activity_main);
edit1=findViewById(R.id.edit1);
edit2 =findViewById(R.id.edit2);
btnAdd =findViewById(R.id.btnAdd);
btnSub =findViewById(R.id.btnSub);
btnMul =findViewById(R.id.btnmul);
btnDiv =findViewById(R.id.btndiv);
result =findViewById(R.id.result);

//이벤트 처리하기
 btnAdd.setOnClickListener(new View.OnClickListener() {
@Override
 public void onClick(View view) {
su1 =edit1.getText().toString();
su11=Integer.parseInt(su1);
su22 =Integer.parseInt(edit2.getText().toString());
res =su11+su22;
result.setText("계산결과:"+res);
mm();
}
});
btnSub.setOnClickListener(new View.OnClickListener() {
@Override
 public void onClick(View view) {
su1 =edit1.getText().toString();
su11=Integer.parseInt(su1);
su22 =Integer.parseInt(edit2.getText().toString());
res =su11-su22;
result.setText("계산결과:"+res);
mm();
}
});

}//onCreate
 public void mm(){
final InputMethodManager imm=
(InputMethodManager)getSystemService(
Context.INPUT_METHOD_SERVICE);
imm.hideSoftInputFromWindow(
getCurrentFocus().getWindowToken(),0);
}//mm()
}
영화관
<?xml version="1.0" encoding="utf-8"?>
<LinearLayout xmlns:android="http://schemas.android.com/apk/res/android"
    xmlns:app="http://schemas.android.com/apk/res-auto"
    xmlns:tools="http://schemas.android.com/tools"
    android:layout_width="match_parent"
    android:layout_height="match_parent"
    android:orientation="vertical"
    android:background="#66197697"
    tools:context=".MainActivity">
<LinearLayout
    android:orientation="vertical"
    android:layout_width="match_parent"
    android:layout_height="wrap_content">
    <TextView
        android:text="   [ hanyang theater] "
        android:textSize="30dp"
        android:layout_width="match_parent"
        android:layout_height="wrap_content"/>
    <Button
        android:text="Screen"
        android:textSize="30dp"
        android:background="#0A1861"
        android:layout_width="match_parent"
        android:layout_height="wrap_content"/>
</LinearLayout>
    <LinearLayout
        android:orientation="horizontal"
        android:layout_width="match_parent"
        android:layout_height="wrap_content">
        <TextView
            android:layout_width="37dp"
            android:text="1"
            android:paddingLeft="10dp"
            android:textSize="20dp"
            android:layout_height="wrap_content"/>
        <TextView
            android:layout_width="37dp"
            android:text="2"
            android:paddingLeft="10dp"
            android:textSize="20dp"
            android:layout_height="wrap_content"/>
        <TextView
            android:layout_width="37dp"
            android:text="3"
            android:paddingLeft="10dp"
            android:textSize="20dp"
            android:layout_height="wrap_content"/>
        <TextView
            android:layout_width="37dp"
            android:text="4"
            android:paddingLeft="10dp"
            android:textSize="20dp"
            android:layout_height="wrap_content"/>
        <TextView
            android:layout_width="37dp"
            android:text="5"
            android:paddingLeft="10dp"
            android:textSize="20dp"
            android:layout_height="wrap_content"/>
        <TextView
            android:layout_width="37dp"
            android:text="6"
            android:paddingLeft="10dp"
            android:textSize="20dp"
            android:layout_height="wrap_content"/>
        <TextView
            android:layout_width="37dp"
            android:text="7"
            android:paddingLeft="10dp"
            android:textSize="20dp"
            android:layout_height="wrap_content"/>
        <TextView
            android:layout_width="37dp"
            android:text="8"
            android:paddingLeft="10dp"
            android:textSize="20dp"
            android:layout_height="wrap_content"/>
        <TextView
            android:layout_width="37dp"
            android:text="9"
            android:paddingLeft="10dp"
            android:textSize="20dp"
            android:layout_height="wrap_content"/>
    </LinearLayout>
 <LinearLayout
     android:orientation="horizontal"
     android:layout_width="match_parent"
     android:layout_height="wrap_content">
     <Button
         android:id="@+id/btn1"
         android:text="1"
         android:layout_width="34dp"
         android:layout_height="wrap_content"/>
     <Button
         android:id="@+id/btn2"
         android:text="2"
         android:layout_width="36dp"
         android:layout_height="wrap_content"/>
     <Button
         android:id="@+id/btn3"
         android:text="3"
         android:layout_width="37dp"
         android:layout_height="wrap_content"/>
     <Button
         android:id="@+id/btn4"
         android:text="4"
         android:layout_width="37dp"
         android:layout_height="wrap_content"/>
     <Button
         android:id="@+id/btn5"
         android:text="5"
         android:layout_width="37dp"
         android:layout_height="wrap_content"/>
     <Button
         android:id="@+id/btn6"
         android:text="6"
         android:layout_width="37dp"
         android:layout_height="wrap_content"/>
     <Button
         android:id="@+id/btn7"
         android:text="7"
         android:layout_width="37dp"
         android:layout_height="wrap_content"/>
     <Button
         android:id="@+id/btn8"
         android:text="8"
         android:layout_width="37dp"
         android:layout_height="wrap_content"/>
     <Button
         android:id="@+id/btn9"
         android:text="9"
         android:layout_width="37dp"
         android:layout_height="wrap_content"/>
 </LinearLayout>
    <LinearLayout
        android:orientation="horizontal"
        android:layout_width="match_parent"
        android:layout_height="wrap_content">
        <TextView
            android:textSize="20dp"
            android:text="which do you want to seat?"
            android:layout_width="wrap_content"
            android:layout_height="wrap_content"/>
        <EditText
            android:id="@+id/seat"
            android:hint="seat>>"
            android:textSize="20dp"
            android:layout_width="wrap_content"
            android:layout_height="wrap_content"/>
    </LinearLayout>
    <Button
        android:id ="@+id/click"
        android:text="click"
        android:textSize="30dp"
        android:layout_width="match_parent"
        android:layout_height="wrap_content"/>
</LinearLayout>


package com.example.myapplication5;

import android.content.Context;
import android.graphics.Color;
import android.os.Bundle;
import android.view.View;
import android.view.inputmethod.InputMethodManager;
import android.widget.Button;
import android.widget.EditText;

import androidx.appcompat.app.AppCompatActivity;

public class MainActivity extends AppCompatActivity {
Button click;
Button[] seats=new Button[9];
EditText seat;

    @Override
    protected void onCreate(Bundle savedInstanceState) {
        super.onCreate(savedInstanceState);
        setContentView(R.layout.activity_main);
        click = findViewById(R.id.click);
        seat = findViewById(R.id.seat);

        Integer seatsId[] ={R.id.btn1, R.id.btn2,R.id.btn3,
                            R.id.btn4, R.id.btn5,R.id.btn6,
                            R.id.btn7, R.id.btn8,R.id.btn9 };
        for(int i =0; i<10;i++){
              seats[i] =findViewById(seatsId[i]);
        }
        click.setOnClickListener(new View.OnClickListener() {
            @Override
            public void onClick(View view) {
                String result = seat.getText().toString();
                Integer res = Integer.parseInt(result);
                seats[res - 1].setText("X");
                seats[res - 1].setBackgroundColor(Color.YELLOW);

                final InputMethodManager imm=
                        (InputMethodManager)getSystemService(
                                Context.INPUT_METHOD_SERVICE);
                imm.hideSoftInputFromWindow(
                        getCurrentFocus().getWindowToken(),0);
            }
        });
    }
}
온클릭 이벤트
버튼 클릭시 텍스트 변경, 토스트 메세지
package com.example.mobile;

import androidx.appcompat.app.AppCompatActivity;

import android.content.Context;
import android.graphics.Color;
import android.os.Bundle;
import android.view.View;
import android.view.inputmethod.InputMethodManager;
import android.widget.Button;
import android.widget.EditText;
import android.widget.TextView;
import android.widget.Toast;

public class MainActivity extends AppCompatActivity {
    Button btn1;
    TextView title;
    EditText editText1;
    static int tmp = 0;
    final InputMethodManager imm= (InputMethodManager)getSystemService(
            Context.INPUT_METHOD_SERVICE);

    @Override
    protected void onCreate(Bundle savedInstanceState) {
        super.onCreate(savedInstanceState);
        setContentView(R.layout.activity_main);
        title = findViewById(R.id.title);
        btn1 = findViewById(R.id.btnclick);
        editText1 = findViewById(R.id.edit1);
//        title.setText("안드로이드");
        btn1.setOnClickListener(new View.OnClickListener() {
            @Override
            public void onClick(View view) {
                //toast - 팝업 텍스트
                if (tmp == 0){
                    title.setText("btn Clicked!");
                    title.setTextColor(Color.BLUE);
                    tmp = 1;
                } else if (tmp == 1) {
                    title.setText("alreay Cliceked!");
                    title.setTextColor(Color.GREEN);
                    tmp = 0;
                }
                Toast.makeText(MainActivity.this, "안드로이드 스터디", Toast.LENGTH_LONG).show();
                String str = editText1.getText().toString();
                btn1.setText(str);
                //버튼 클릭하면 키보드 창 숨기기
                imm.hideSoftInputFromWindow(getCurrentFocus().getWindowToken(),0);

            }
        });
    }
}
<?xml version="1.0" encoding="utf-8"?>
<LinearLayout xmlns:android="http://schemas.android.com/apk/res/android"
    xmlns:app="http://schemas.android.com/apk/res-auto"
    xmlns:tools="http://schemas.android.com/tools"
    android:layout_width="match_parent"
    android:layout_height="match_parent"
    android:orientation="vertical"
    tools:context=".MainActivity">

    <TextView
        android:id="@+id/title"
        android:textColor ="#f00"
        android:layout_width="wrap_content"
        android:layout_height="wrap_content"
        android:textSize="37dp"
        android:text="위젯 이벤트 처리하기"/>
    <EditText
        android:id="@+id/edit1"
        android:hint="name"
        android:layout_width="match_parent"
        android:layout_height="wrap_content"/>
    <Button
        android:id="@+id/btnclick"
        android:text="click"
        android:textSize="30dp"
        android:layout_gravity="center_horizontal"
        android:layout_width="wrap_content"
        android:layout_height="wrap_content"
        android:onClick="btn1"/>

</LinearLayout>
android, iphone, windowphone;
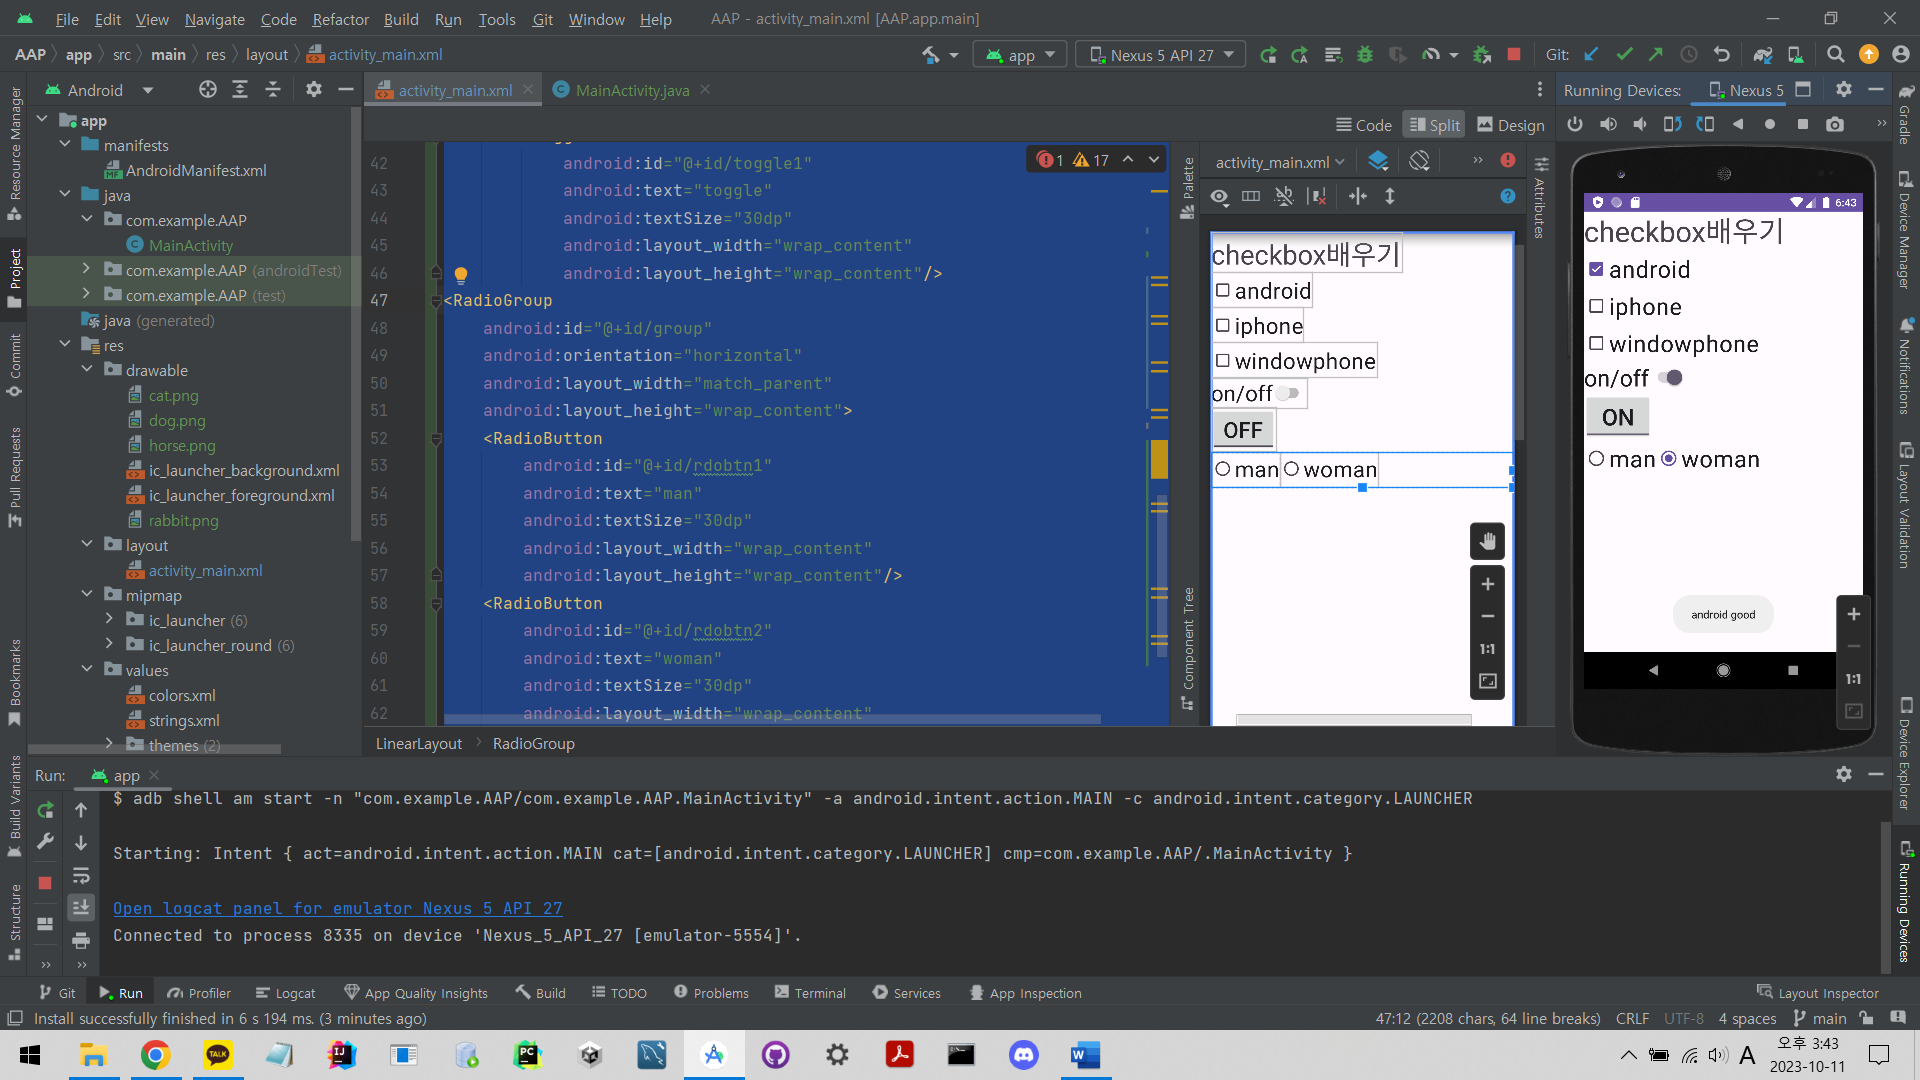
실습 1 - 체크박스를 체크하면 토스트 메세지를 띄우는 실습
CompoundButton - 체크박스, 라디오버튼, 스위치, 토글버튼의 상위 클래스
onCheckedChanged 메서드 사용할때 호출한다
체크박스 - 여러개를 체크 가능한 체크박스 UI
activity_main.xml로 가서 레이아웃을 LineayLayout으로 변경하고 윈도우폰,애플,안드로이드에 해당하는 체크박스를 만든 후 id를 할당해서 버튼 이벤트가 가능하게 한다
radio - 그룹 내의 라디오버튼은 중복으로 선택 x
switch on/off 두가지 가능한 스위치
togglebutton - 밀어서 두가지중에 하나고르는 느낌의 버튼
<?xml version="1.0" encoding="utf-8"?>
<LinearLayout xmlns:android="http://schemas.android.com/apk/res/android"
    xmlns:app="http://schemas.android.com/apk/res-auto"
    xmlns:tools="http://schemas.android.com/tools"
    android:layout_width="match_parent"
    android:layout_height="match_parent"
    android:orientation="vertical"
    tools:context=".MainActivity">

    <TextView
        android:id="@+id/title"
        android:layout_width="wrap_content"
        android:layout_height="wrap_content"
        android:textSize="37dp"
        android:text="checkbox배우기"/>

    <CheckBox
        android:id="@+id/android"
        android:text="android"
        android:textSize="30dp"
        android:layout_width="wrap_content"
        android:layout_height="wrap_content"/>
    <CheckBox
        android:id="@+id/iphone"
        android:text="iphone"
        android:textSize="30dp"
        android:layout_width="wrap_content"
        android:layout_height="wrap_content"/>
    <CheckBox
        android:id="@+id/windowphone"
        android:text="windowphone"
        android:textSize="30dp"
        android:layout_width="wrap_content"
        android:layout_height="wrap_content"/>
    <Switch
        android:id="@+id/switch1"
        android:text="on/off"
        android:textSize="30dp"
        android:layout_width="wrap_content"
        android:layout_height="wrap_content"/>
        <ToggleButton
            android:id="@+id/toggle1"
            android:text="toggle"
            android:textSize="30dp"
            android:layout_width="wrap_content"
            android:layout_height="wrap_content"/>
<RadioGroup
    android:id="@+id/group"
    android:orientation="horizontal"
    android:layout_width="match_parent"
    android:layout_height="wrap_content">
    <RadioButton
        android:id="@+id/rdobtn1"
        android:text="man"
        android:textSize="30dp"
        android:layout_width="wrap_content"
        android:layout_height="wrap_content"/>
    <RadioButton
        android:id="@+id/rdobtn2"
        android:text="woman"
        android:textSize="30dp"
        android:layout_width="wrap_content"
        android:layout_height="wrap_content"/>
</RadioGroup>
</LinearLayout>
MainActivity.java에서는 CheckBox 변수로 만들어둔 android, iphone, windowphone을 id를 찾아서 가져오고
onCheckedChanged 메서드로 해당 체크박스를 클릭하면 토스트 메세지가 뜨는 기능을 구현한다
package com.example.AAP;

import androidx.appcompat.app.AppCompatActivity;

import android.content.Context;
import android.graphics.Color;
import android.os.Bundle;
import android.view.View;
import android.view.inputmethod.InputMethodManager;
import android.widget.Button;
import android.widget.CheckBox;
import android.widget.CompoundButton;
import android.widget.EditText;
import android.widget.TextView;
import android.widget.Toast;

public class MainActivity extends AppCompatActivity {
    //체크박스 가져오기
    CheckBox android, iphone, windowphone;
    @Override
    protected void onCreate(Bundle savedInstanceState) {
        super.onCreate(savedInstanceState);
        setContentView(R.layout.activity_main);
        android = findViewById(R.id.android);
        iphone = findViewById(R.id.iphone);
        windowphone = findViewById(R.id.windowphone);

        //온클릭 이벤트 리스너로 이벤트 실행
        android.setOnCheckedChangeListener(new CompoundButton.OnCheckedChangeListener() {
            @Override
            public void onCheckedChanged(CompoundButton compoundButton, boolean b) {
                //팝업 위치,텍스트,팝업 유지 시간을 받아서 팝업창을 띄우는 함수 makeText
                Toast.makeText(MainActivity.this, "android good", Toast.LENGTH_LONG).show();
            }
        });

        iphone.setOnCheckedChangeListener(new CompoundButton.OnCheckedChangeListener() {
            @Override
            public void onCheckedChanged(CompoundButton compoundButton, boolean b) {
                Toast.makeText(MainActivity.this, "iphone good", Toast.LENGTH_LONG).show();
            }
        });

        windowphone.setOnCheckedChangeListener(new CompoundButton.OnCheckedChangeListener() {
            @Override
            public void onCheckedChanged(CompoundButton compoundButton, boolean b) {
                Toast.makeText(MainActivity.this, "windowphone good", Toast.LENGTH_LONG).show();
            }
        });
    }
}
실행 화면
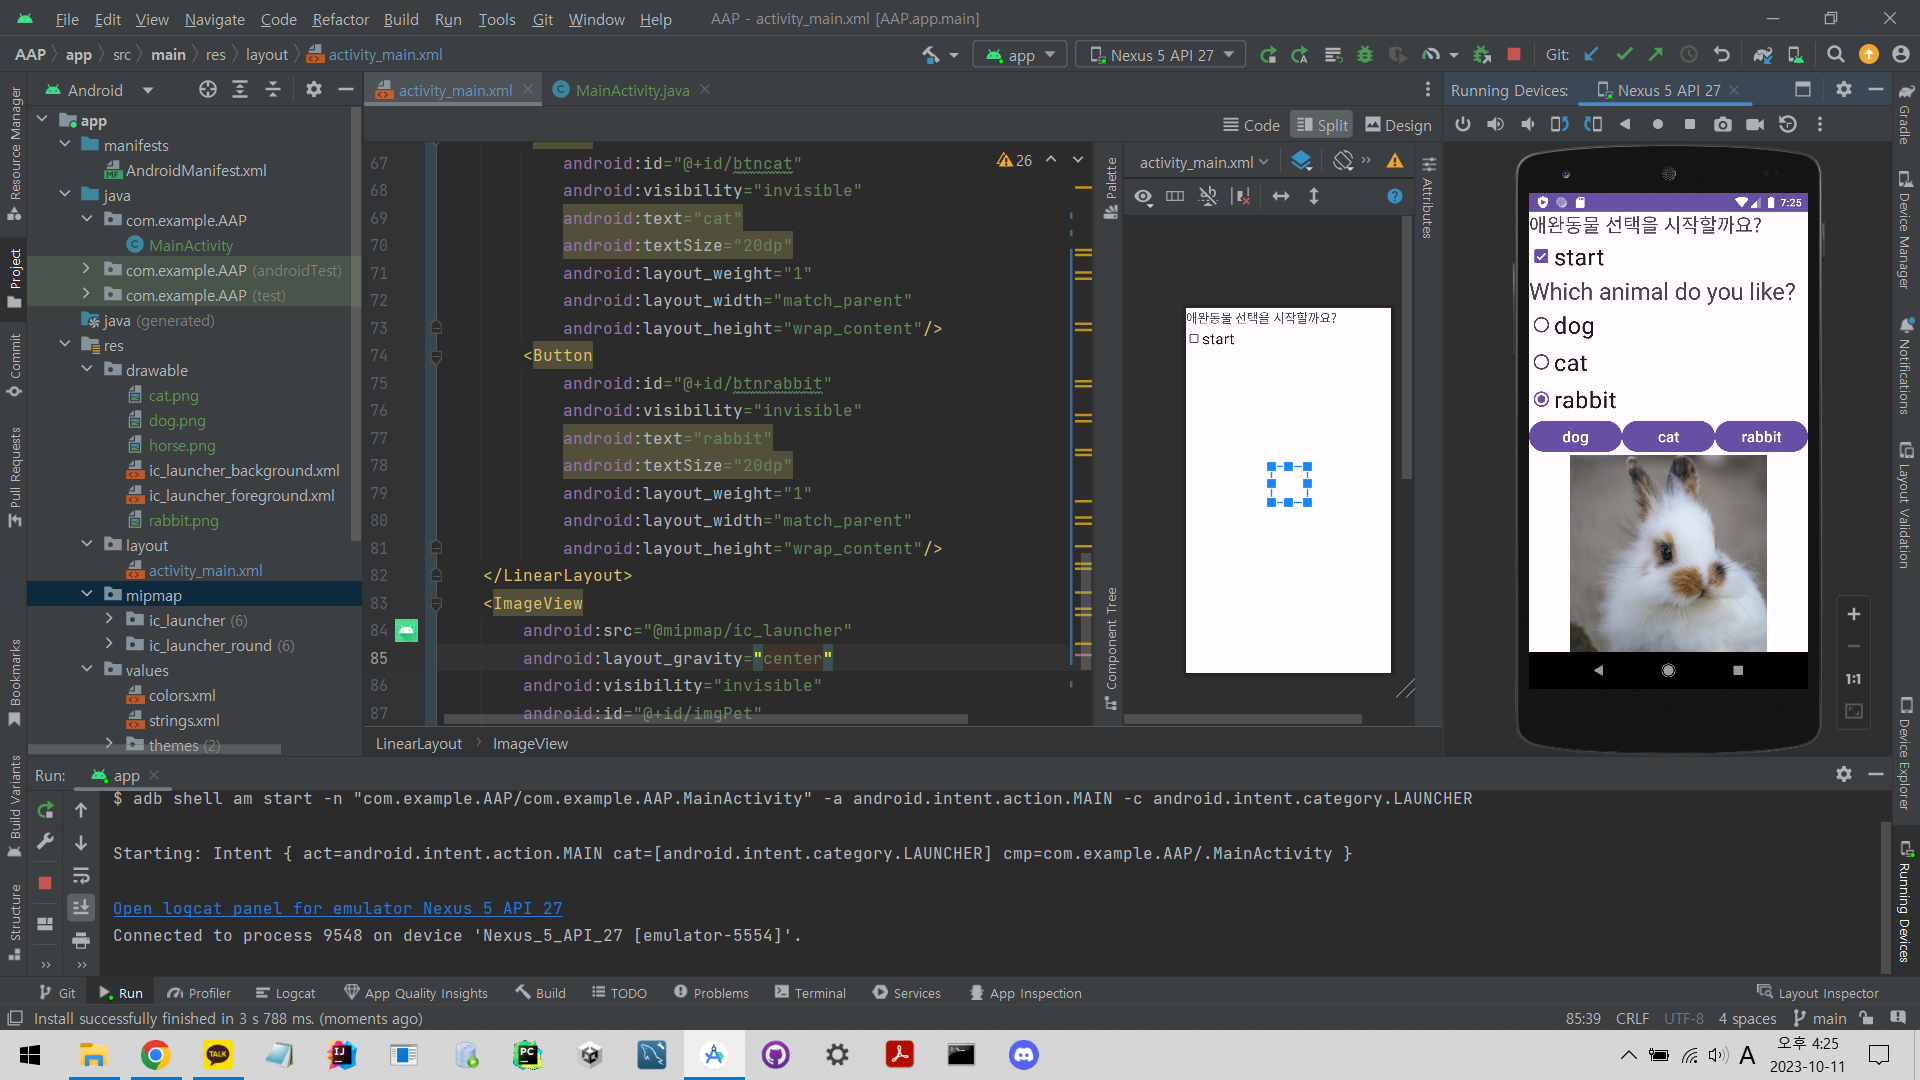
실습 2 - 체크한 라디오 버튼 텍스트에 맞는 동물 이미지를 띄우는 것 같은데 녹화가 10분만 되고 끊어진 것 같습니다
이미지 넣을땐 drawble이나 mipmap 폴더에 넣기
라디오 버튼, 라디오 그룹 - 라디오 버튼은 같은 그룹안에 잇으면 하나씩만 선택 가능
선택한 동물의 이미지가 팝업되는거 같은 2번과제에서는 체크박스보다는 라디오 버튼이 적절해서 라디오 버튼을 사용한 것 같습니다.
activity_main.xml은 상단에 텍스트 뷰와 체크 박스로 애완동물 선택을 시작하는지 여부를 묻고
선택을 시작하면 숨겨뒀던 ui들을 보이게 한 후
버튼 온클릭 이벤트로 해당하는 버튼을 클릭하면 이미지뷰테서 동물 사진을 띄워주는 것으로 이해했습니다
<?xml version="1.0" encoding="utf-8"?>
<LinearLayout xmlns:android="http://schemas.android.com/apk/res/android"
    xmlns:app="http://schemas.android.com/apk/res-auto"
    xmlns:tools="http://schemas.android.com/tools"
    android:layout_width="match_parent"
    android:layout_height="match_parent"
    android:orientation="vertical"
    tools:context=".MainActivity">

    <TextView
        android:id="@+id/title"
        android:layout_width="wrap_content"
        android:layout_height="wrap_content"
        android:textSize="25dp"
        android:text="애완동물 선택을 시작할까요?"/>
    <CheckBox
        android:id="@+id/chkAgree"
        android:text="start"
        android:textSize="30dp"
        android:layout_width="wrap_content"
        android:layout_height="wrap_content"/>
    <TextView
        android:id="@+id/text"
        android:layout_width="match_parent"
        android:layout_height="wrap_content"
        android:visibility="invisible"
        android:text="Which animal do you like?"
        android:textSize="30dp"/>
    <RadioGroup
        android:id="@+id/group"
        android:orientation="vertical"
        android:visibility="invisible"
        android:layout_width="match_parent"
        android:layout_height="wrap_content">
        <RadioButton
            android:id="@+id/rdodog"
            android:text="dog"
            android:textSize="30dp"
            android:layout_width="wrap_content"
            android:layout_height="wrap_content"/>
        <RadioButton
            android:id="@+id/rdocat"
            android:text="cat"
            android:textSize="30dp"
            android:layout_width="wrap_content"
            android:layout_height="wrap_content"/>
        <RadioButton
            android:id="@+id/rdorabbit"
            android:text="rabbit"
            android:textSize="30dp"
            android:layout_width="wrap_content"
            android:layout_height="wrap_content"/>
    </RadioGroup>
    <LinearLayout
        android:layout_width="match_parent"
        android:layout_height="wrap_content"
        android:orientation="horizontal">
        <Button
            android:id="@+id/btndog"
            android:visibility="invisible"
            android:text="dog"
            android:textSize="20dp"
            android:layout_weight="1"
            android:layout_width="match_parent"
            android:layout_height="wrap_content"/>
        <Button
            android:id="@+id/btncat"
            android:visibility="invisible"
            android:text="cat"
            android:textSize="20dp"
            android:layout_weight="1"
            android:layout_width="match_parent"
            android:layout_height="wrap_content"/>
        <Button
            android:id="@+id/btnrabbit"
            android:visibility="invisible"
            android:text="rabbit"
            android:textSize="20dp"
            android:layout_weight="1"
            android:layout_width="match_parent"
            android:layout_height="wrap_content"/>
    </LinearLayout>
    <ImageView
        android:src="@mipmap/ic_launcher"
        android:visibility="invisible"
        android:layout_gravity="center"
        android:id="@+id/imgPet"
        android:layout_width="wrap_content"
        android:layout_height="wrap_content"/>

</LinearLayout>
package com.example.AAP;

import androidx.appcompat.app.AppCompatActivity;

import android.content.Context;
import android.graphics.Color;
import android.os.Bundle;
import android.view.View;
import android.view.inputmethod.InputMethodManager;
import android.widget.Button;
import android.widget.CheckBox;
import android.widget.CompoundButton;
import android.widget.EditText;
import android.widget.ImageView;
import android.widget.RadioButton;
import android.widget.RadioGroup;
import android.widget.TextView;
import android.widget.Toast;

public class MainActivity extends AppCompatActivity {

    TextView text;
    CheckBox chkAgree;
    Button btndog, btncat, btnrabbit;
    ImageView imgPet;
    RadioButton rdodog, rdocat, rdorabbit;
    RadioGroup radioGroup;
    @Override
    protected void onCreate(Bundle savedInstanceState) {
        super.onCreate(savedInstanceState);
        setContentView(R.layout.activity_main);

        text = findViewById(R.id.text);
        chkAgree = findViewById(R.id.chkAgree);
        radioGroup = findViewById(R.id.group);
        btndog = findViewById(R.id.btndog);
        btncat = findViewById(R.id.btncat);
        btnrabbit = findViewById(R.id.btnrabbit);
        imgPet = findViewById(R.id.imgPet);

        rdodog = findViewById(R.id.rdodog);
        rdocat = findViewById(R.id.rdocat);
        rdorabbit = findViewById(R.id.rdorabbit);

        chkAgree.setOnCheckedChangeListener(new CompoundButton.OnCheckedChangeListener() {
            @Override
            public void onCheckedChanged(CompoundButton compoundButton, boolean b) {
                if (chkAgree.isChecked()){
                    text.setVisibility(View.VISIBLE);
                    radioGroup.setVisibility(View.VISIBLE);
                    btncat.setVisibility(View.VISIBLE);
                    btndog.setVisibility(View.VISIBLE);
                    btnrabbit.setVisibility(View.VISIBLE);
                    imgPet.setVisibility(View.VISIBLE);
                }
                else {
                    text.setVisibility(View.INVISIBLE);
                    radioGroup.setVisibility(View.INVISIBLE);
                    btndog.setVisibility(View.INVISIBLE);
                    btncat.setVisibility(View.INVISIBLE);
                    btnrabbit.setVisibility(View.INVISIBLE);
                    imgPet.setVisibility(View.INVISIBLE);
                }
            }
        });
        btndog.setOnClickListener(new View.OnClickListener() {
            @Override
            public void onClick(View view) {
                imgPet.setImageDrawable(getDrawable(R.drawable.dog));
            }
        });
        btncat.setOnClickListener(new View.OnClickListener() {
            @Override
            public void onClick(View view) {
                imgPet.setImageDrawable(getDrawable(R.drawable.cat));
            }
        });
        btnrabbit.setOnClickListener(new View.OnClickListener() {
            @Override
            public void onClick(View view) {
                imgPet.setImageDrawable(getDrawable(R.drawable.rabbit));
            }
        });
    }
}
실행 사진
이미지뷰, 이미지도 온클릭 설정 가능하다
<?xml version="1.0" encoding="utf-8"?>
<LinearLayout xmlns:android="http://schemas.android.com/apk/res/android"
    xmlns:app="http://schemas.android.com/apk/res-auto"
    xmlns:tools="http://schemas.android.com/tools"
    android:layout_width="match_parent"
    android:layout_height="match_parent"
    android:orientation="vertical"
    tools:context=".MainActivity">

    <TextView
        android:gravity="center_horizontal"
        android:textSize="40dp"
        android:text="My profile"
        android:textColor="#00f"
        android:layout_width="wrap_content"
        android:layout_height="wrap_content"/>

    <LinearLayout
        android:layout_weight="1"
        android:orientation="horizontal"
        android:layout_width="match_parent"
        android:layout_height="match_parent">
        <TextView
            android:id="@+id/txt10"
            android:layout_height="wrap_content"
            android:layout_width="150dp"
            android:text="10대"
            android:textSize="30dp" />
        <ImageView
            android:id="@+id/img10"
            android:layout_width="200dp"
            android:layout_height="100dp"
            android:src="@drawable/boy"/>
    </LinearLayout>

    <LinearLayout
        android:layout_weight="1"
        android:orientation="horizontal"
        android:layout_width="match_parent"
        android:layout_height="match_parent">
        <TextView
            android:id="@+id/txt20"
            android:layout_height="wrap_content"
            android:layout_width="150dp"
            android:text="20대"
            android:textSize="30dp" />
        <ImageView
            android:id="@+id/img20"
            android:layout_width="200dp"
            android:layout_height="100dp"
            android:src="@drawable/guy"/>
    </LinearLayout>

    <LinearLayout
        android:layout_weight="1"
        android:orientation="horizontal"
        android:layout_width="match_parent"
        android:layout_height="match_parent">
        <TextView
            android:id="@+id/txt30"
            android:layout_height="wrap_content"
            android:layout_width="150dp"
            android:text="30대"
            android:textSize="30dp" />
        <ImageView
            android:id="@+id/img30"
            android:layout_width="200dp"
            android:layout_height="100dp"
            android:src="@drawable/man"/>
    </LinearLayout>

</LinearLayout>
package com.example.androidapp;
import androidx.appcompat.app.AppCompatActivity;
import android.graphics.Color;
import android.os.Bundle;
import android.view.View;
import android.widget.ImageView;
import android.widget.TextView;
import android.widget.Toast;
public class MainActivity extends AppCompatActivity{
TextView txt10, txt20, txt30;
ImageView img10, img20, img30;
@Override
public void onCreate(Bundle savedInstanceState){
super.onCreate(savedInstanceState);
setContentView(R.layout.activity_main); // activity_main.xml 파일을 화면에 표시
txt10 = findViewById(R.id.txt10);
txt20 = findViewById(R.id.txt20);
txt30 = findViewById(R.id.txt30);
img10 = findViewById(R.id.img10);
img20 = findViewById(R.id.img20);
img30 = findViewById(R.id.img30);
img10.setOnClickListener(new View.OnClickListener() {
@Override
public void onClick(View view) {
txt10.setBackgroundColor(Color.YELLOW);
txt10.setText("seoul 출신");
Toast.makeText(MainActivity.this,"서울출신입니다",Toast.LENGTH_LONG).show();
}
});
img20.setOnClickListener(new View.OnClickListener() {
@Override
public void onClick(View view) {
txt20.setBackgroundColor(Color.GREEN);
txt20.setText("에리카 출신");
Toast.makeText(MainActivity.this,"에리카 출신입니다",Toast.LENGTH_LONG).show();
}
});
img30.setOnClickListener(new View.OnClickListener() {
@Override
public void onClick(View view) {
txt30.setBackgroundColor(Color.BLUE);
txt30.setText("안산 출신");
Toast.makeText(MainActivity.this,"안산출신입니다",Toast.LENGTH_LONG).show();
}
});
}
}
리니어 레이아웃 화면 구성
<?xml version="1.0" encoding="utf-8"?>
<LinearLayout xmlns:android="http://schemas.android.com/apk/res/android"
    android:layout_width="match_parent"
    android:layout_height="match_parent"
    android:orientation="vertical">

    <LinearLayout
        android:layout_width="match_parent"
        android:layout_height="match_parent"
        android:layout_weight="1"
        android:orientation="horizontal">

        <LinearLayout
            android:layout_width="match_parent"
            android:layout_height="match_parent"
            android:layout_weight="1"
            android:background="#ff0000"
            android:orientation="vertical">
        </LinearLayout>

        <LinearLayout
            android:layout_width="match_parent"
            android:layout_height="match_parent"
            android:layout_weight="1"
            android:orientation="vertical">

            <LinearLayout
                android:layout_width="match_parent"
                android:layout_height="match_parent"
                android:layout_weight="1"
                android:background="#ffff00"
                android:orientation="vertical">
            </LinearLayout>

            <LinearLayout
                android:layout_width="match_parent"
                android:layout_height="match_parent"
                android:layout_weight="1"
                android:background="#000000"
                android:orientation="vertical">
            </LinearLayout>

        </LinearLayout>

    </LinearLayout>

    <LinearLayout
        android:layout_width="match_parent"
        android:layout_height="match_parent"
        android:layout_weight="1"
        android:background="#0000ff"
        android:orientation="vertical">
    </LinearLayout>

</LinearLayout>
리니어 레이아웃 정렬

<?xml version="1.0" encoding="utf-8"?>
<LinearLayout xmlns:android="http://schemas.android.com/apk/res/android"
    xmlns:app="http://schemas.android.com/apk/res-auto"
    xmlns:tools="http://schemas.android.com/tools"
    android:layout_width="match_parent"
    android:layout_height="match_parent"
    tools:context=".MainActivity"
    android:background="#FF0"
    android:orientation="vertical"
    android:gravity="center">

    <LinearLayout
        android:layout_width="250dp"
        android:layout_height="250dp"
        android:background="#ff00"
        android:gravity="center">
        <LinearLayout
            android:layout_width="150dp"
            android:layout_height="150dp"
            android:background="#0f0">

        </LinearLayout>
    </LinearLayout>


</LinearLayout>
RelativeLayout
시작은 좌상단, layout_alignParent방향 속성으로 위치 지정 가능, 리니어와 다르게 각각 위치시켜야한다
<?xml version="1.0" encoding="utf-8"?>
<RelativeLayout xmlns:android="http://schemas.android.com/apk/res/android"
    xmlns:app="http://schemas.android.com/apk/res-auto"
    xmlns:tools="http://schemas.android.com/tools"
    android:layout_width="match_parent"
    android:layout_height="match_parent"
    tools:context=".MainActivity">
    <TextView
        android:text="text5번"
        android:textSize="40dp"
        android:layout_centerInParent="true"
        android:padding="10dp"
        android:background="#0ff"
        android:layout_width="wrap_content"
        android:layout_height="wrap_content"/>

    <TextView
        android:text="text6번"
        android:textSize="40dp"
        android:layout_centerInParent="true"
        android:layout_alignParentLeft="true"
        android:padding="10dp"
        android:background="#f0a"
        android:layout_width="wrap_content"
        android:layout_height="wrap_content"/>

    <TextView
        android:text="text8번"
        android:textSize="40dp"
        android:layout_centerHorizontal="true"
        android:padding="10dp"
        android:background="#f0a"
        android:layout_width="wrap_content"
        android:layout_height="wrap_content"/>

    <TextView
        android:text="text9번"
        android:textSize="40dp"
        android:layout_alignParentRight="true"
        android:layout_centerVertical="true"
        android:padding="10dp"
        android:background="#f0a"
        android:layout_width="wrap_content"
        android:layout_height="wrap_content"/>

    <TextView
        android:text="text1번"
        android:textSize="40dp"
        android:padding="10dp"
        android:background="#0f0"
        android:layout_width="wrap_content"
        android:layout_height="wrap_content"/>
    <TextView
        android:layout_alignParentRight="true"
        android:text="text2번"
        android:textSize="40dp"
        android:padding="10dp"
        android:background="#f00"
        android:layout_width="wrap_content"
        android:layout_height="wrap_content"/>
    <TextView
        android:layout_alignParentLeft="true"
        android:layout_alignParentBottom="true"
        android:text="text3번"
        android:textSize="40dp"
        android:textColor="#fff"
        android:padding="10dp"
        android:background="#00f"
        android:layout_width="wrap_content"
        android:layout_height="wrap_content"/>

    <TextView
        android:layout_alignParentRight="true"
        android:layout_alignParentBottom="true"
        android:text="text4번"
        android:textSize="40dp"
        android:padding="10dp"
        android:background="#fff"
        android:layout_width="wrap_content"
        android:layout_height="wrap_content"/>


</RelativeLayout>

RelativeLayout을 위젯 id 기준으로 요소 찾기
base 기준으로 상하좌우에 요소를 정렬했다
<?xml version="1.0" encoding="utf-8"?>
<RelativeLayout xmlns:android="http://schemas.android.com/apk/res/android"
    xmlns:app="http://schemas.android.com/apk/res-auto"
    xmlns:tools="http://schemas.android.com/tools"
    android:layout_width="match_parent"
    android:layout_height="match_parent"
    tools:context=".MainActivity">

    <TextView
        android:layout_centerInParent="true"
        android:id="@+id/base"
        android:text="base"
        android:textSize="40dp"
        android:textAlignment="center"
        android:background="#f00"
        android:layout_width="150dp"
        android:layout_height="150dp"/>
    <TextView
        android:layout_toLeftOf="@+id/base"
        android:layout_alignTop="@+id/base"
        android:text="1"
        android:textSize="30dp"
        android:padding="10dp"
        android:background="#800f"
        android:layout_width="wrap_content"
        android:layout_height="wrap_content"/>

    <TextView
        android:layout_toRightOf="@+id/base"
        android:layout_alignTop="@+id/base"
        android:text="1"
        android:textSize="30dp"
        android:padding="10dp"
        android:background="#800f"
        android:layout_width="wrap_content"
        android:layout_height="wrap_content"/>

    <TextView
        android:layout_toLeftOf="@+id/base"
        android:layout_alignBottom="@+id/base"
        android:text="3"
        android:textSize="30dp"
        android:padding="10dp"
        android:background="#8ff0"
        android:layout_width="wrap_content"
        android:layout_height="wrap_content"/>
    <TextView
        android:layout_toRightOf="@+id/base"
        android:layout_alignBottom="@+id/base"
        android:text="4"
        android:textSize="30dp"
        android:padding="10dp"
        android:background="#8ff0"
        android:layout_width="wrap_content"
        android:layout_height="wrap_content"/>

    <TextView
        android:layout_above="@+id/base"
        android:layout_alignLeft="@+id/base"
        android:text="5"
        android:textSize="30dp"
        android:padding="10dp"
        android:background="#8ff0"
        android:layout_width="wrap_content"
        android:layout_height="wrap_content"/>

    <TextView
        android:layout_above="@+id/base"
        android:layout_alignRight="@+id/base"
        android:text="6"
        android:textSize="30dp"
        android:padding="10dp"
        android:background="#8ff0"
        android:layout_width="wrap_content"
        android:layout_height="wrap_content"/>

    <TextView
        android:layout_below="@+id/base"
        android:layout_alignLeft="@+id/base"
        android:text="7"
        android:textSize="30dp"
        android:padding="10dp"
        android:background="#8ff0"
        android:layout_width="wrap_content"
        android:layout_height="wrap_content"/>

    <TextView
        android:layout_below="@+id/base"
        android:layout_alignRight="@+id/base"
        android:text="8"
        android:textSize="30dp"
        android:padding="10dp"
        android:background="#8ff0"
        android:layout_width="wrap_content"
        android:layout_height="wrap_content"/>

</RelativeLayout>
기준 여러개로 만드는 렐러티브 레이아웃
<?xml version="1.0" encoding="utf-8"?>
<RelativeLayout xmlns:android="http://schemas.android.com/apk/res/android"
    xmlns:app="http://schemas.android.com/apk/res-auto"
    xmlns:tools="http://schemas.android.com/tools"
    android:layout_width="match_parent"
    android:layout_height="match_parent"
    tools:context=".MainActivity">

    <TextView
        android:id="@+id/base1"
        android:text="기준1"
        android:textSize="40dp"
        android:padding="10dp"
        android:textColor="#fff"
        android:background="#008"
        android:layout_width="wrap_content"
        android:layout_height="wrap_content"/>
    <TextView
        android:id="@+id/base2"
        android:layout_alignParentRight="true"
        android:layout_centerVertical="true"
        android:text="기준2"
        android:textSize="40dp"
        android:padding="10dp"
        android:textColor="#fff"
        android:background="#008"
        android:layout_width="wrap_content"
        android:layout_height="wrap_content"/>

    <TextView
        android:layout_toRightOf="@+id/base1"
        android:layout_above="@+id/base2"
        android:text="text1"
        android:textSize="40dp"
        android:padding="10dp"
        android:background="#eea"
        android:layout_width="wrap_content"
        android:layout_height="wrap_content"/>

    <TextView
        android:layout_below="@+id/base1"
        android:layout_alignParentRight="true"
        android:text="text2"
        android:textSize="40dp"
        android:padding="10dp"
        android:background="#eea"
        android:layout_width="wrap_content"
        android:layout_height="wrap_content"/>

</RelativeLayout>
실습
전화번호 화면 만들기
<?xml version="1.0" encoding="utf-8"?>
<RelativeLayout xmlns:android="http://schemas.android.com/apk/res/android"
    xmlns:app="http://schemas.android.com/apk/res-auto"
    xmlns:tools="http://schemas.android.com/tools"
    android:layout_width="match_parent"
    android:layout_height="match_parent"
    tools:context=".MainActivity">


    <TextView
        android:id="@+id/text1"
        android:layout_width="wrap_content"
        android:layout_height="wrap_content"
        android:text="전화번호"
        android:textSize="30dp"
        android:layout_marginTop="5dp"/>

    <EditText
        android:id="@+id/edit1"
        android:layout_toRightOf="@+id/text1"
        android:layout_width="wrap_content"
        android:layout_height="wrap_content"
        android:text="000-0000-0000"
        android:textSize="30dp" />
    <Button
        android:id="@+id/btn1"
        android:layout_marginTop="10dp"
        android:layout_width="wrap_content"
        android:layout_height="wrap_content"
        android:layout_below="@+id/text1"
        android:layout_alignParentRight="true"
        android:textSize="30dp"
        android:text="cancel"
        android:backgroundTint="#0f0"/>
    <Button
        android:id="@+id/btn2"
        android:layout_marginTop="10dp"
        android:layout_below="@+id/text1"
        android:layout_toLeftOf="@id/btn1"
        android:layout_marginRight="10dp"
        android:layout_width="wrap_content"
        android:layout_height="wrap_content"
        android:backgroundTint="#0f0"
        android:textSize="30dp"
        android:text="ok"/>


</RelativeLayout>


